
I like to introduce a program that I’m developing at the moment. It is used to program Deltang receiver using the Prog4 programmers comfortable on your computer. The program is “Open Source” (source is included in the installer package) and is released under the “GNU GENERAL PUBLIC LICENSE Version 3”.
In addition to a Windows PC you need (of course) a Prog4 plus a serial to USB cable to connect the Prog4 to the PC. And of course the “DT-Programmer” software which can be downloaded from the link below. Just click the link at the end of the article to download the program. The most recent version will always be to find there.
After downloading, open the zip archive and run the file contained therein. With the help of an ordinary installer “DT-Programmer” is installed on the PC. That should be possible to everyone.
After installing DT-Programmer you should first connect the Prog4 to the PC. Under certain circumstances, drivers for the serial to USB cables need to be installed. This is necessary so as these cables create an additional COM port on the PC. This COM port must be selected in the DT-Programmer. But it will only be displayed if it exists. And that is only the case if the cable is plugged in.
On top of the receiver to be programmed must first be bound to the Prog4, exactly as it otherwise is done with the transmitter. For this, the Prog4 has a sideway “Bind button”. Actually, the receiver should remember that they (also) are bound to the Prog4. However, it is repeatedly happened to me, that the RX “forgets” about the binding.
The program is running in English and German language and can be translated easily into any other language. All used terms and vocables are external stored in an “.lng” file, a simple text file that can be edited with notepad or similar by everyone.
On very first start you need to do a little configuration. For this you need to select the “configuration” menu entry on the top of the window.
Here another window opens where you can do the needed configuration:
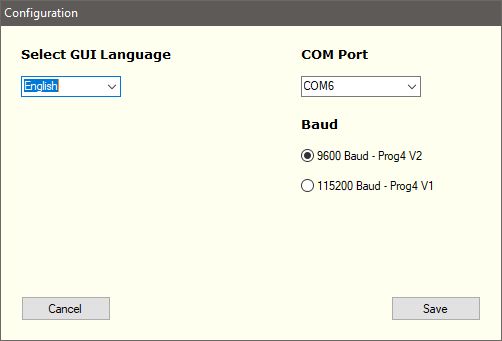
The GUI- language should be set to your preferences. You also need to select the COM port where the Prog4 is connected too. That’s why the Prog4 should be connected at first start. The baud rate depends on the version of your Prog4. The older V1 needs 115200 baud and the recent V2 needs 9600 baud. So you need to know which version your Prog4 is.
Once you’re done you need to save settings and restart the program. A requester is telling you about the need to restart the program after clicking on “Save”. Save the settings, close the program and restart it again, now you can start programming.
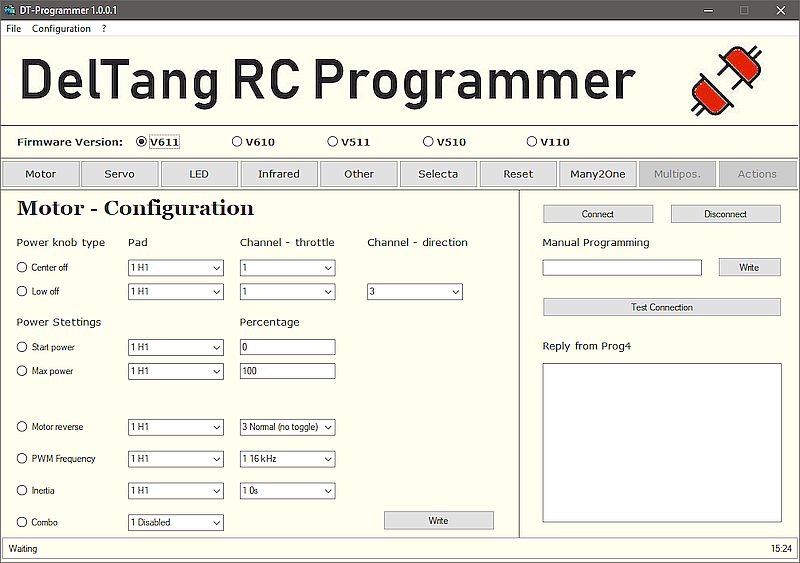
The window is similarly structured at each point. The right part is always the same.
The first step always is to connect the program to the COM port. In the right area of the main window there are buttons to connect and disconnect, to test the connection (that gives the version number of your Prog4 as response) and to manually program a feature. This is useful for new and not yet included options. You only need to type the correct sequence, e.G. “7,2,7” to change the variant of a V610 receiver to “22 – Train with Selecta”…
After clicking on connect the logo in the top right corner changes from red to green, if the connection was successful.
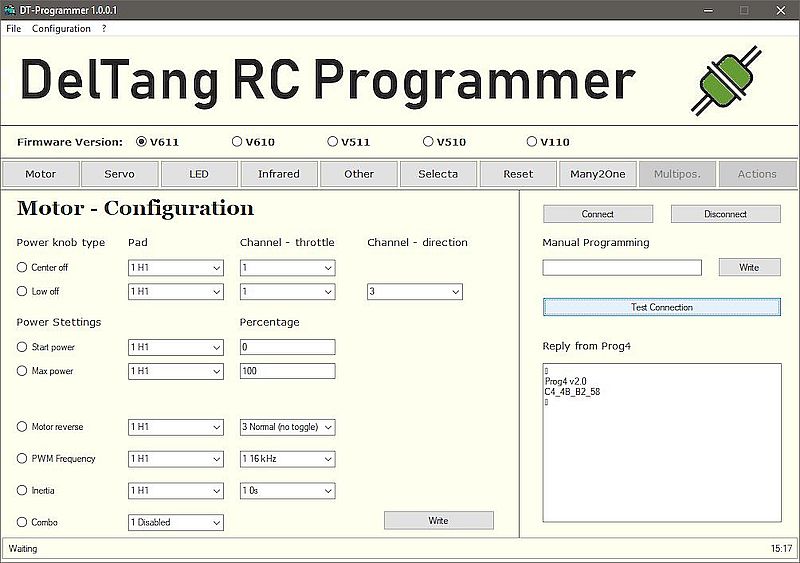
The text field in the lower right area is the response window and displays all messages send from Prog4 back to the PC. If you test the connection and everything went well a message similar to the one on the screenshot should be appear.
Normally you should disconnect the COM port when done. For this the disconnect button is available. On a clean exit of the program the connection is closed properly too, so it did not matter if you forgot to close the connection…
Once the connection is established you can start programming your RX. You need to know the firmware version of your RX. Sadly there is no way to read the firmware from RX with Prog4 so you need to select the matching firmware version manually. If you don’t know the version of your RX you need to have a look on it. The firmware version always is hand written to the biggest chip on the RX.
If you know the matching firmware you need to select it in the top row. Then the navigation bar may change, depending on the number and type of options the selected firmware has. Most options are on V611 least are on V110…
The navigation buttons are representing more or less the menu structure as shown on the DelTang website. Some menu entries are holding very few others have many options to program. So some of those “too many” options are changed over to a different menu. Especially some “LED” options are transferred to the “Infrared” menu in “DT-Programmer”. But I’m sure you will find then, if you want to change them…
As the vast majority of DelTang RX only accept one command at a time you need to write every command one after the other. For this you only can select one option at once. Set your values for the first option and click “Write”. After the “Ok” response of the Prog4 select the next option, set the next values and “write” again. And so on, and so on… This way it is working on every window excerpt for the “Reset” menu. Here are more than one Button as here are completely different options are bundled. This menu also changes a lot depending on the selected firmware. Here it is for V611:
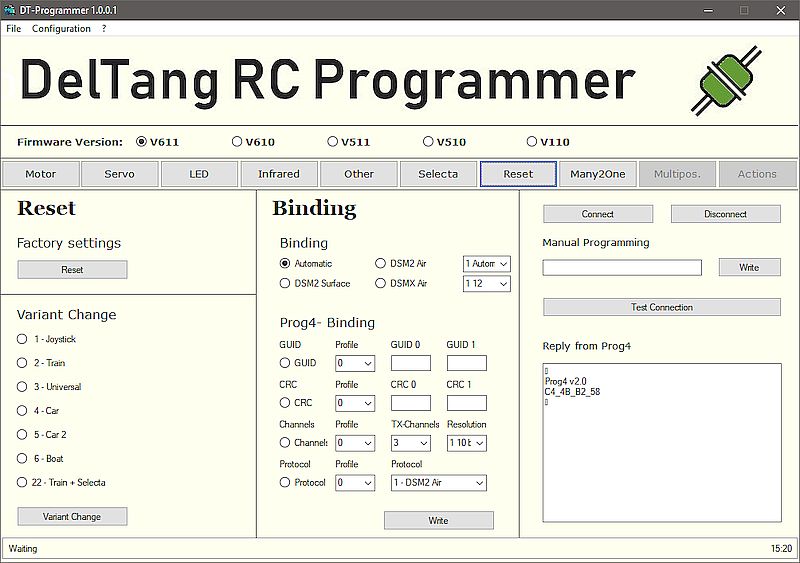
You see three buttons. For V610 it looks as:
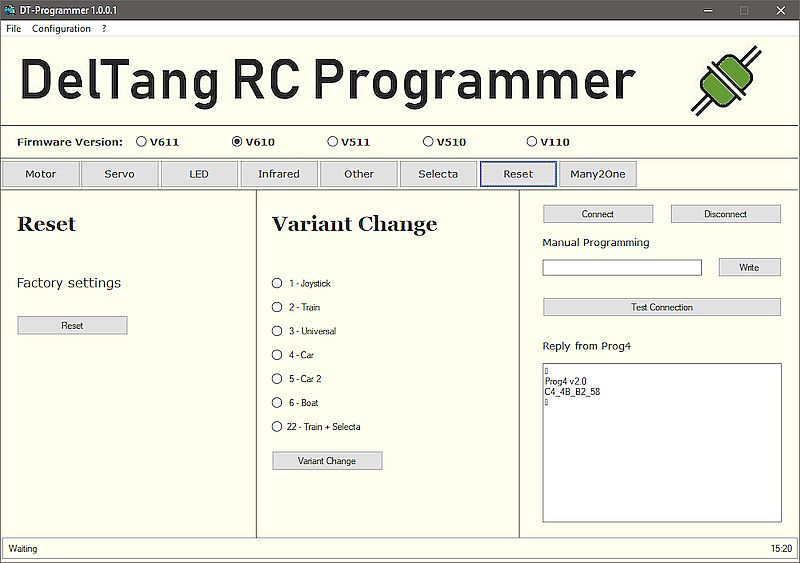
Here are two buttons available. Aside this exception all windows only have one Button…
Since version 1.0.3.2 of DT-Programmer there is a new feature available. This generates a programming protocol so you keep the overview about what you’ve programmed to your RX.
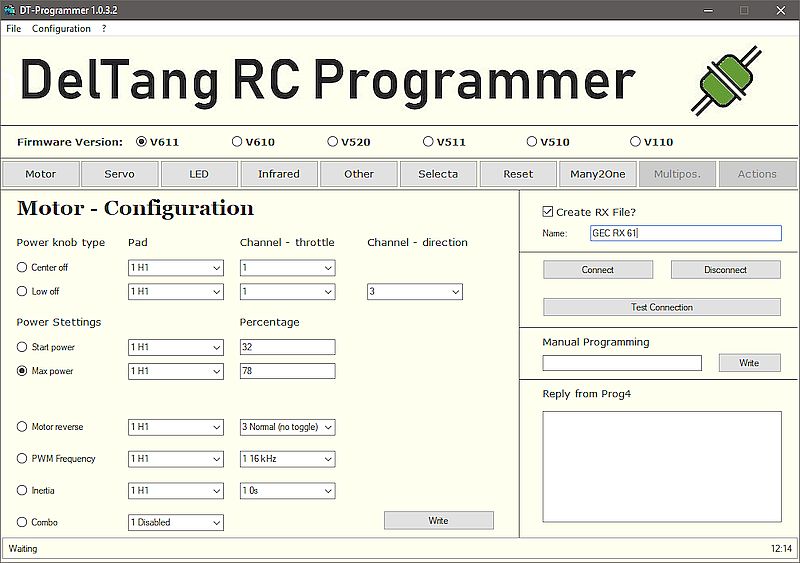
For this you can set a name to use for the protocol in the top right area above the “connect” button. This can be whatever you like but it would be best to choose a meaningful name, e.g. the name and type of the model and the RX. If you don’t set a name the protocol will be named “protocol.txt”.
A protocol file will be generated on first programming step in a sub- directory of the installation folder named “RX”. The protocol files are plain text files and can be viewed with Notepad or any other text viewer/editor… You also can opt to not generate a protocol at all, e.g. if you are programming other peoples RX or similar… Once a protocol- file is generated all future changes will be written at the end of the existing file, if you choose the same file name as before. In a later version DT-Programmer will include a protocol manager to view and delete protocol files. But this will take it’s time to complete. Up to then you can manage the protocols easily with Explorer or similar tools…
I think you will have a clue now how it works.
At the current state V110, V510, V511, V520 and V610 is supported completely (I hope) and V611 also is complete excerpt for Menu 12 and 13 (as on DelTang website). In general everything that is not greyed out should work.
Like!! Really appreciate you sharing this blog post.Really thank you! Keep writing.
I want to to thank you for this fantastic read!!
I certainly loved every little bit of it. I have got you book
marked to look at new things you post…
Vielen Dank für diesen informativen Artikel. Ihr Blog ist sehr hilfreich. Ich hoffe, Sie können uns weiterhin informieren.
I am having problems connecting to the Prog4 (V1). The USB lead is FTDI chip based and works reliably with CoolTerm and the Prog4. The connections for CoolTerm is 115200 -8-E-1 XON/XOFF.
I have tried changing the parity and the handshake but always get the unable to connect error. The port is correct and the baude is set to 115200 in the programmer.
Any suggestions please?
Thank you.
Hi.
Do you have your prog4 attached directly to the PC or to an USB hub? If there is an USB hub involved, please try it without and attach the programmer directly to an USB port on the PC itself. My own Prog4 V2 never worked when attached to a hub but always when attached directly…
I never had my hands on a Prog4 V1 so I couldn’t test anything. Needed to write this “blind”. But the connection string is exactly as described on the Deltang website. The only difference between V1 and V2 is the Baud rate, that must be 115200 for V1 and 9600 for V2… Everything else must be identical if I understand the website correct.
If this did not help, please have a look into the log file and copy & paste the line about the connection (similar to this line):
“04.01.2021 19:46:03 – Info – $connection = COM4 baud=9600 parity=E data=8 stop=1 xon=on dtr=on rts=on”
Aside the date and time and probably the com port the value behind baud should be 115200 in your case instead of 9600 as in the above example…
Hope this can solve your issue.
Hello,
Firstly the connection data was the same as your example but the COM port was 21 and the data rate 115200.
After testing again with no success I cleared the COM port enumerator, reassigned the COM port to 4 and reconfigured the DT Programmer.
Now it connects. Maybe for some reason the high port number was the problem. Although using Coolterm was OK with COM21.
I do have a different problem with the Prog4 V1 as it only works sometimes with both the terminal and your programmer. I am told that the V2 with a 9600 baud rate is better but even that can be unreliable.
Your GUI programmer is very good but it looks like the hardware it drives is the main problem which is a shame.
I have build a simple transmitter with 2 switches and will use that. Not so elegant but it is 100% reliable
Thank you for your help and advice.
Hi.
What about buying a Prog4 V2? It is very reliable for anyone I know who’s using it (incl. myself) The only drawback is, the Prog 4 don’t like USB Hubs that much. But if you respect this is it working flawlessly.
Hello,
Buying a Prog4 v2 v2 is an option but for the number of changes I make, using a Tx20 transmitter is OK provided the LED flash counts are worked out in advance. This works every time whereas the Prog4 works very occasionally. I am not using a hub.
The other problem is that the Prog4 is now hard to get as they are not stocked by the resellers due to product unreliability. I could make a special order but at the moment am reluctant to do so.
The receivers I program are usually the Rx41d and Rx43d (both with v520) and the Rx65c with v611.
Thank you.
Hello,
I decided to persevere with the Prog4v1 to see if I could get it working. I am using a brand new Rx65c receiver which is marked 81 and 11 so I assumed that it has the 611 version software.
To test I am changing the output on P6 to respond to CH2 and to go low when the low is transmitted. The sequence for this is 3,6,1,2,4 which, when I used a terminal program, correctly configured the receiver.
So using your programmer with v611, I selected the LED page and selected Momentary, Pad 6, Channel 2 and Type 4. Pressing Write gets no response from the receiver.
I then entered 3,6,1,2,4 in the manual programming box and sent that, which did work. This suggests that the sequence from the panel is somehow different from the manual send.
I created a RX file which shows the manual sequences but there is nothing shown for the panel sequence. Also the ‘Waiting’ in the bottom left corner never changes.
There is one other thing, although I am using a Rx65c with 611 software I cannot get 2 way communication with my prog4v1. Does your program only work in 2 way mode with 611 software?
Alternatively am I doing some thing wrong?
Thank you.
Hi.
The two way programming is not implemented. As this is abandoned already and will not be included in any other RX it wasn’t worth the effort. What’s wrong with 3.6.1.2.4 I need to investigate further. Maybe there is a bug in the program.
Hello,
Further information.
I have tested the output of the programmer by monitoring the output port.
On v611 only data sent from the Motor, Servo, Other, Selecta and Reset Tabs produce an output. LED and Infrared fail to produce any output. I didn’t test ,amy2One.
The LED tab works on v610.
Hope that helps.
Regards.
Hi.
Many thanks for your investigation. I could find a bug in DT-Programmer. I will upload a new, fixed version now. Please download the new version 1.0.3.3 and try again.
Hello,
I have downloaded 1.0.3.3 and the LED and Infrared options now work as expected on v611.
During next week I will test more options but I expect it is OK now.
Thanks for the update.
Regards,